Nodes
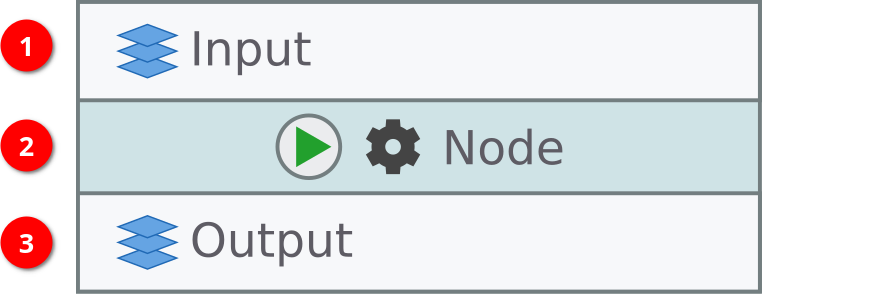
JIPipe allows you to combine processing steps into a pipeline by drawing a flow chart. Processing steps are represented as nodes that all follow a basic structure.

- ➊ Input slots
All incoming data is received from the top via input slots. The number of input slots may vary depending on the node type and for some nodes can be even modified. Each slot features a name and a representative icon of the supported data type (e.g., images, ROI).
- ➋ Handle
At the center of each node, there is a (usually colored) handle that contains a button to execute the node (if supported), the representative icon of the node, and the name of the node.
- ➌ Output slots
All data produced by the node are placed in its output slots. Similar to the set of input slots, the number of outputs varies depending on the node. Each slot features a name and a representative icon of the supported data type (e.g., images, ROI).
Selecting and moving nodes
Nodes can be selected with a 🖱 left click or by 🖱 dragging a selection rectangle around them. You can also hold Shift and click/drag to add or remove nodes from the selection.
Nodes can be moved by 🖱 dragging them by the colored (central) area or by selecting them with a 🖱 left click and moving them with the arrow keys ←↑ →↓.
Connecting and disconnecting nodes
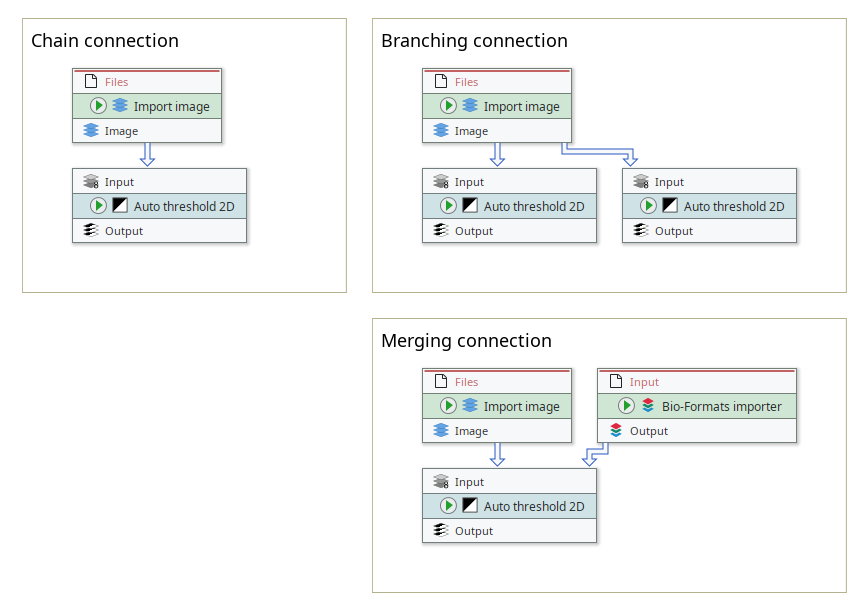
To create a workflow, you need to connect nodes via their input and output slots. JIPipe supports simple (chain) connections, the formation of branches to process data with multiple paths, and due to JIPipe's unique way of batch processing also the merging of multiple data sources.

There are multiple ways to create and delete connections between nodes:
- Using your mouse
Node inputs/outputs can be connected by 🖱 dragging a line between the input and output. It does not matter if the connection is started from the output or the input.
- Using the context menu
If nodes are further away, you can also use the slot's context menu that can be opened by clicking
 or 🖱 right-click. Here you can create new connections, manage existing connections, and also quickly remove all connections at once.
 - Using the node finder
You can also use the function to create connections between existing nodes or even automatically insert new nodes. The function can be accessed from within the slot's context menu or by 🖱 double-clicking the slot.
Rewiring connections
If you want to move all connections from one input/output to another input/output, you can use the tool that can be accessed via ![]() or by pressing F3.
or by pressing F3.
This tool "grabs" all connections from an input or output and moves the connections to another input/output, similar to if you unplug a power plug and put it into another socket.